As it is said, there is blessing in disguise. The demonetisation drive of the Modi-led-NDA received criticism from many quarters, but the move seemed well-intended to reduce black money.
Cash-less India led to rise in digital transactions, and even those who initially resisted using internet banking, mobile banking, etc., came to heel and made efforts to learn how to transact the new-age way.
Technology has indeed been an enabler, making it easier to perform financial transactions. After credit cards and debit cards, digital wallets became well-known, and now the Unified Payment Interface (UPI) – launched by the National Payments Corp. of India (NPCI) – which went live last year, has further been a boon and brought a revolutionary change in the way transactions are performed. The UPI app facilitates quick and easy fund transfers at any given point of time, plus you can even shop using UPI app.
With the emergence of UPI, it seems all other payment options are likely to become less prominent in years to come, and use of paper currency would reduce considerably. So, when you shop online, while the ‘pay on delivery’ may still be available, the use of UPI to make a real-time transfer instead of using cash is likely to increase. There has already been a whooping growth of around 367% transactions in terms of volume using the UPI app.
How does the UPI App work?
UPI runs on Immediate Payment Service (IMPS) platform, and hence, the service is available 24X7. In India, this service is now available with 21 banks. The upper limit for fund transfers is Rs 1 lakh.
How does one use the UPI App?
Well, you got to follow these 5 simple steps and you’re ready to transact / transfer money anytime, anywhere.
Step #1: Download the UPI App
This application is predominantly available on android, but given that iOS is the second most popular operating system in the world, even iOS users can use UPI app.
All you need to have is:
- A smartphone;
- Preferably a high-speed internet connection (luckily, they don't consume much data and space. Most of them would use up anywhere between 5 MB to 13 MB of space); and
- A bank account with your mobile number registered
So, if you have the above, just go ahead, search for the UPI app of your bank and download it.
Please note, it’s not binding on you to use the UPI app of the bank you have an account with, but you can also download the UPI app of any other bank of your choice and efficiently use it.
Once the download is completed, enter your mobile number for verification. In this article, we’ve used the ICICI Bank UPI app, as an example, to explicate how to go about using it.
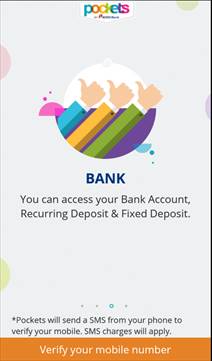
(Source: ICICI Bank UPI App)
Your mobile number will fetch all your account details. Check these details thoroughly and click on ‘continue’ to confirm.
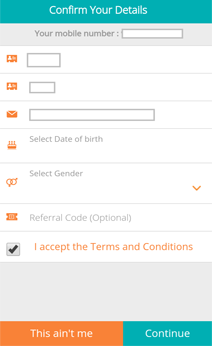
(Source: ICICI Bank UPI App)
This will lead you to the page for a four-digit secured pin number: M-PIN; create one and remember it.
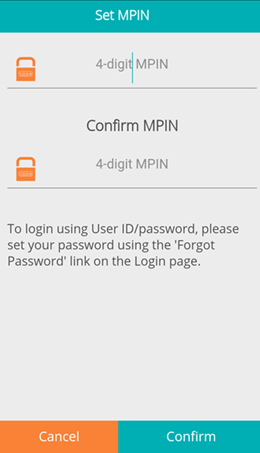
(Source: ICICI Bank UPI App)
From now on, this pin number will be required each time you log-in to the app.
Note: Please do not share this PIN with anyone and keep it safely.
Step #2: Create a Virtual Payment Address
The Virtual Payment Address (VPA) can be as simple as your name or mobile number followed by bank address. For example, HDFC Bank has @hdfcbank, ICICI Bank has @icici, Axis Bank has @axisbank, etc.
So, for instance, if you are using the Axis Pay UPI App, your virtual ID can be "yourname@axisbank" or “yourmobilenumber@axisbank. If you wish to use your mobile number instead you can do so as well. Say if his mobile number is 980080221, his VPA can also be like – 9800800221@axisbank.
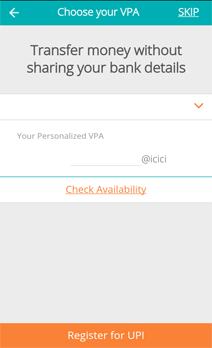
(Source: ICICI Bank UPI App)
As mentioned before, the real pull or attraction of the UPI app is you need not be the bank’s customer to use its app. For example, if you want to use the UPI app of Axis Bank, you need not hold an account with the said bank. The VPA you create and the linkage of the bank account will take care of it.
Unlike in the net banking option, you need not disclose any sensitive and difficult-to-remember information such as a 15-digit account number or IFSC code. This virtual ID becomes your identity to anyone transacting with you, and the app doesn't require more information to allow you to send and receive money. You can also pay bills, send money, and collect money using UPI Apps. Advanced options such as ‘scan and pay’ (QR Code Scan) is also available –useful to pay your shopping bills.
Step 3: Link your bank account
Next step is to choose the bank account from the list of banks available. Once you select the bank, it’s sorted; you no longer have to submit your account details. This is because your mobile number has been registered and linked to your account. It will automatically fetch all your details. You can link your multiple bank accounts to one UPI app.
Step 4: Send and Receive Money using UPI app
Once registered, you can then start transferring – paying / receiving – money immediately, as oppose to net banking, where you have to wait until your payee is added to your list. For example, if you want to pay Rs 5000 to your friend, all you need is your VPA and your friend’s VPA. Thus both, the giver and receiver need to have a UPI app, plus their VPA.
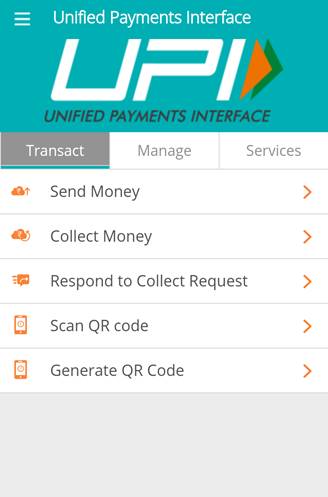
(Source: ICICI Bank UPI App)
Here is how to do it:
- Log-in to your UPI enabled bank app using your M-PIN;
- Go to send money and select the receiver using VPA (but it would be vital to confirm the VPA details of receiver or your money might get transferred to incorrect account);
- Enter the amount and send the money; and
- The money will be instantly credited to your friend’s account (as it is based on IMPS system).
Remember, the money can be transferred even over the weekends and bank holidays.
Likewise, you can even raise a collection request to the people who owe you money. For example, you had lent money to your friend and wish to collect the money from him today; you can log-in into your app and click on collect money option. All you need is:
- VPA address of your friend;
- Raise a ‘collect money’ request;
- Your friend will receive a notification or a message;
- He can then click on ‘Respond to Collect Request’ and can either choose to pay now or later. If he wishes to pay later, it will remain as a pending transaction. Keep in mind, the payer also has an option to decline your request.
Here are 5 key benefits of using the UPI App…
- UPI is the cheapest and easiest way of money transfer
- You are no longer required to share your bank details and can still transact using VPA
- You can link multiple accounts using one UPI based app and will no longer need different apps of different banks
- Collect Payment service has made it easier to ask for payments
- The QR Code Scan feature facilitates payment for online as well as offline purchases. All such transactions are possible through this one app as all your accounts can be linked to single window.
Besides the above, most UPI apps also offer a dashboard for you to do a variety of things.

(Source: ICICI Bank UPI App)
By using the UPI app, you can even track your money across all your bank accounts and still make transactions (pay, receive, spend) through one single window at any given point of time.
To conclude, the UPI app has definitely brought in ease and convenience. You no longer have to refill your e-wallets, instead transact through this app and keep earning interest on your money parked in savings account. It is a hassle-free way to send and receive money.
So, go ahead and download the UPI bank of your choice now, be tech-smart in handling your personal finances, go cash-less, and support the Modi-led-NDA Government’s digitization drive.
Add Comments